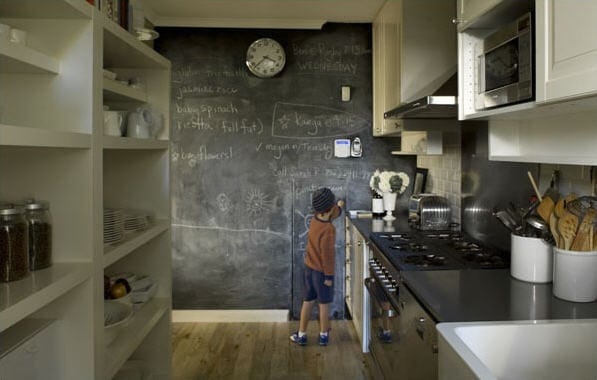
What do you normally do when you are too busy in the kitchen and have no time to grab a pen and a notebook, or even your phone, to jot down something important? At such a time, the best, and certainly the coolest thing to do would be to write it down on the chalkboard wall. In case you don’t have one, here is a guide on how to paint a kitchen chalkboard wall:
Choose the perfect location and gather the necessary materials
In doing this, you need to choose a location that is convenient in terms of being easy to access and, one that doesn’t take up a lot of kitchen space more so within the high traffic areas. The best way of doing this is by visualizing how the chalkboard will look like and how it’s going to impact (negatively or positively) on the whole kitchen space and design.
When it comes to gathering the necessary painting materials and supplies, the first and most important thing that you’ll have to purchase is erasable latex chalkboard paint. It’s important that you purchase enough paint so that it covers the entire chalkboard area (two coats are required). You’ll also need a drop cloth, gloves, safety glasses, grit sandpaper, paint roller, paint tray, painter’s tape and a ladder.
Prepare the wall
Before you start painting, move the kitchen appliances so as to prevent them from getting paint stains and, remove any baseboards and keep them on safe place for they will have to be re-installed later. Next, place a drop cloth on the floor (next to the wall to be painted) and use a painter’s tape to protect ceiling intersections and the wall edges.
Paiting the wall
Start by pouring the latex chalkboard paint into a small container. This first paint should be used in cutting in around the ceiling corners, wall edges and the window trims. Apply two coats.
Next, roller paint the rest of the wall. You’ll be expected to work in small areas and roll small quantities of paint on the wall while adopting an up and down motion cum the ‘W’ motion. While doing this, try as much as possible to avoid roller ridges. When done with the first coat, wait for two hours before applying the second.
Finishing up
Once the second coat has dried (about 30 minutes after the application), pull off the painter’s tape and dispose it. Then, use warm water to clean the roller and the roller pan. Also, remove the drop cloth and reinstall the baseboard. Lastly, arrange your kitchen appliances back into their usual locations.
Although the chalkboard wall will be all dried up and ready for use after a few hours, it’s important that you wait for roughly 12 hours before you can start writing on it.
You may also choose to decorate the chalkboard wall by hanging up a clock, attaching up a rack to hold up your best cooking pans and, finding a cool storage box to store your chalks and eraser in.